Thursday 15 December 2011

Dressing up Barbie

Christmas is coming (I'll pause to allow those who have not realised it yet to gasp in shock) and that means finding presents for my family.  Today's post covers the present for my three year old niece who can't read or search the internet yet, thus making it safe for me to post about.

Given that my knitting addiction shows no signs of abating I thought I'd make some more clothes for Barbie.  Partly to feed my crafting addiction and partly because it seems hard to even find clothes in the shops- it is a tad excessive to need to buy a whole new doll every time you want to get a new costume!

So I searched Ravelry and found a magnificent site for knitting Barbie patterns: Sticka till Barbie.  There are hundreds of different patterns there!  Using some left over sock yarn I had, I quickly whipped up a little coat and a little hat (#88 and #A40 respectively if you are looking for the pattern).
barbie jacket  barbie hat

Then yesterday I was prowling in a little local craft shop that I had not visited before and found some lovely sparkly fingering yarn (Peter Pan Washable Goldfingering).  It was just cheap enough that I found myself justifying my purchase.  I ended up choosing pattern #984, Green Long Gown to make.

Due to the amount of yarn I had though (about 100m on the ball) I ended up having to modify the pattern a bit.  While the original was for a floor length gown, I had to make a shorter skirt.  To make the edge of the skirt more interesting I also used a picot bind off.  Attempt one though was going to need a bit more yarn than I had (I was about 20 stitches away from finishing when I ran out and needed to go back and pick up 180+ stitches- d'oh!).  I decreased the number of picots and all was well (I cast on 2, bound off 6 and repeated this pattern right the way through).

Here is one of my old Barbie dolls testing out the dress (two photos, one without flash, one with because the detail shows better without but the colour is truer with flash).   It is now wrapped up, ready for Christmas day and I can now get back to knitting my Queen Anne's curse (I've nearly finished Chart 3).
Barbie dress 2 by Kelshandra
Barbie dress in green

Monday 5 December 2011

A special swamp dragon for your Hogswatch tree

For those who are not familiar to Discworld you have two choices- go away and read all the wonderfully funny Terry Pratchett books you can get your hands on, or just skip to the part where I talk about making a pom-pom dragon and ignore the weird references to explosions and the Hogfather.

For everyone else, this is a little project that I wrote up for my Hogswatch card recipients this year (I wanted to send the supplies to go with it but sadly this would've made my envelopes too large to be sent as letters, let alone cards, and postage is expensive enough to the other side of the world without making parcels.  So they, like you, will have to scrounge up some supplies to work with.  As you will see though, this is not particulary hard- pom-poms can be made, pipe cleaners are necessary and glue, felt and googly eyes are fun to buy and not expensive.

This project is to make a little swamp dragon to hang on your tree- or a bunch of them, stitting in the tree, flaming softly, inadvertently exploding when the crackers are pulled, drooling and disolving the presents underneath...  it wouldn't be Hogswatch without them*!


Pom-Pom Swamp Dragon
Materials needed

  • 1 Large pompom
  • 1 Medium pompom
  • 3 or 5 Small pompoms
  • Pipe cleaner
  • Felt
  • 2 Googly eyes
  • Glue
  • Scissors
  • String
1. Glue the small pompom for the dragon snout to the medium pompom (the head). Glue this head to the large pompom for the body. Glue the googly eyes onto the head.
Glue small pom-pom to medium for snout and googly eyes above this to make the head.

2. Cut your pipe cleaner to 12 cm in length and bend into a M shape. Use two shorter lengths of pipe cleaner wrapped around the two top corners of the M to make the wing supports for each wing (see picture)


Step 2 and 3- Pipe cleaner and felt guide

3. Cut the felt to the shape of your wings. Glue the felt to the wings, then glue the wings to the body.


4. Cut a long triangle of felt for the tail. Cut a short length of pipe cleaner and glue to the tail felt. Glue this to the back for your swamp dragon tail.


5. Glue the remaining small pompoms for the legs of the dragon. You can also glue another two for the arms but I ran out of pompoms!
Awe, how could you not want to make this little guy?

Tie a short length of string around the body so you can hang up your Hogswatch decoration! And leave a comment or send me a picture if you make one.  I'd love to see!


* Swamp dragons on trees are not part of official Discworld cannon.  But they would be brilliant, don't you think?  I mean it's not that far in terms of insanity to the Victorian tradition of the tree filled with burning candles, right?

Sunday 4 December 2011

Queen Anne's Curse

Time for a new knitting project! I have not totally finished the Labyrinth bag yet but the weather has been too cold for blocking.  I like to block outside on hot Melbourne days because things dry nice and fast- the weather and my schedule have not meshed yet so I've a few things in the block queue.

I decided that now was the time to make Queen Anne's Lace (ravelry link), a lovely pattern designed by MMario.  I had stumbled on the crochet cotton I had bought years ago to make it so I even had the material needed on hand.  After some searching I found my double pointed needles (DPNs).  While I seem to have more than a dozen (all metal- this will be important later), it also appears that the only size I have is 3 mm so that decided the gauge!  Casting on was as fiddly as all get out.  That first join and then the first few rounds, all while juggling four very slippery needles caused a few false starts but once I got a few rows in things got a little easier.

Then disaster- one of the needles dropped (cotton on metal- no friction to speak of.  Gravity and indeed, random gusts of wind will be sufficient to pull needles out.  Recommended for use only in zero G by masochists) and 4-5 stitches fell off.  Bad words were said.  Saying a prayer to the knitting gods I tried to quickly pick up the stitches before they noticed they were free and unrestrained.  While a few seemed a little wonky, I thought I had gotten away with it.  A few rounds later I switched everything to a cable needle (ripping the packaging open to get it- apparently I had bought a 3 mm circular needle some time ago but didn't need it until now- this will be important later).  A few further rounds (to row 20 to be precise) I had enough room on the cable to pull back and see how the lace was developing...
Queen Anne disaster #1
Attempt #1.  Can you see where the pattern goes wrong?

Yeah, turns out that I hadn't picked up those stitches as well as I had thought.  And because of the needle, over half of the pattern was out of phase- you can see in the picture above that the pattern (moving anticlockwise from 12) starts out lovely, then goes to put at about 8 o'clock.  There was no way I was going to be able to fix that.  So I sighed sadly and frogged the lot.

Attempt #2
I hadn't made it to the shops (once I had things onto the circular needle there wasn't the same urgency to get some bamboo DPNs.  But I knew of their evil properties now.  I was not going to be beaten by four inanimate objects.  The initial fiddliness was perhaps slightly mitigated by experience this time and I soon was knitting comfortably.  As soon as I could, I transferred the work to the cable needle and could thus banish the evil metal DPNs to the storage tin, safe in the knowledge that my work was now safe on a needle with only two ends where stitches could be lost, not six.  Several rows pass.

I was getting into the flow and things were getting to that zen like state you get when knitting.  The hands do the work on muscle memory, with only the occasional input needed from the brain of either 1,2, yarn over, 1, 2, yarn over... or the slightly more processing rich 'you've reached the end of a row, pause to check what's next' stage.  Both of which generally allow for other entertainment to simultaneously occur (reading things online is my favourite).  I am using the magic loop method (or my weird version of it, I've never worked out if I do it 'properly' since I came up with it on my own- I never realised that people normally use two cable needles and that using only one was odd so I just figured out a method when I first started knitting in the round).

Row 13, which means it is a lace row.  I successfully do the first half of the circle.  I give my cable needle a gentle tug to pull things into place for the second half and- $%*&~!  Why is there just the unattached needle in my hand?  Where's the ruddy cable?  That must mean it’s come of the cable and …. oh no. Please don’t tell me that half my stitches have been pulled off... OK, I won't tell you but don't look at your hand...  And remember readers, that was a new (Sullivans- they are not on my good list so I'll name them! Besides the only reason why I know is because it was a new needle) cable needle.
Queen Anne Attempt 2
Attempt #2.  Note the broken cable needle and that large stretch of unrestrained lace

So attempt #2 is dead (well I went to complain to Mum and when I said I was going to rip it apart she said she could probably use the remains on a card so I just cut the thread).

Attempt 3 is waiting until I get a new cable needle (NOT the same brand), probably some new bamboo DPN to start it with and a large bottle of something to make me happy.  I also went back and renamed this project in my Ravelry list.  Besides, Queen Anne's Curse sounds like a pirate ship's name which I like.


Friday 2 December 2011

Into the Labyrinth Bag Part 1

This is a variation of a lovely bag The Anticraft's online 'zine.  It is called Creeping Jenny and I really loved the innovative design.  It uses a piece of vinyl with holes punched around the edge which the yarn is then picked up through and knitted.  The pattern also uses an interesting contrast of black and a bright green that I love.

The materials I used (due to the difficulty finding supplies sometimes, I had to make a few subsitutions).
  • 1 piece of leather, 16 cm in diameter
  • Smallest leather punch you can find (mine is about 2-2.5 mm in diameter)
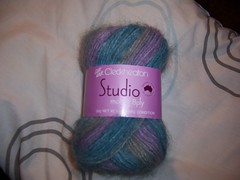
  • 1 skein each of '2nd Time Cotton', one charcoal (922) and one avocado (549)
  • 4.5 mm circular knitting needle
  • Stitch markers
I was going to make this as written (well, more or less).  I found a bit of leather (old scrap from my Mum's craft stash) that I cut to shape and punched holes in.  The Creeping Jenny pattern calls for 100 holes around the edge of the 16 cm diameter, or about one 2 mm hole every 5 mm.  But I was worried that this would actually end up weakening the base- think of the perforations on stamps to make them easy to tear apart!  So instead I only made half the number of holes.
Sticky tape is a great way to hold your template in place while you make the holes
I only punched every other hole because I didn't want to have a weak join
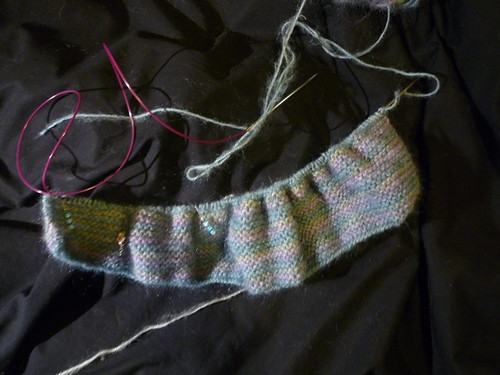
To cast on from your base you need a small crochet hook that will fit through the holes of the base.  From the right side, push your crochet hook through the hole and use this to pull a loop of wool to the right side.  Place this onto a circular knitting needle.Repeat until you have 50 stitches on your needle.


In the first round, knit in the front and back of loop to double the number of stitches.  Knit the next four rounds to make the base.

Originally I intended to make the Creeping Jenny pattern- sort of a yin-yang feel pattern.  But then I started to think.  I liked the pattern, but it wasn't quite right.  What I wanted was similar but more like.... a maze... like a labyrinth!  Ooooh....  I saw a lovely example a month or so ago on Craftster using tunisian crochet.  The colours of this are lovely (the only thing that prevented me from changing my colours was the fact I'd already bought my yarn!).  I could've used this pattern but since I'm knitting in the round, I thought it would be nice to have a maze that went all the way around.

To google I went!  Only to find that there were was no such thing out in internet land- d'oh!  There is only one thing to do- make one myself.  Step one was to make a maze.  Now here I did cheat a bit.  In my internet searching I found this terrific maze generator.  It lets you pick the size and dimensions of the maze that you wish to make, along with an option of 'average path length' or 'how far on average before reaching a turn'.  It then makes both a review black and white image of the maze (to get a feel for how it will look as a pattern) along with a graph version.  Because the size will include a border around the edge, I generated a 101 wide by 39 high maze with an average path length of 3.

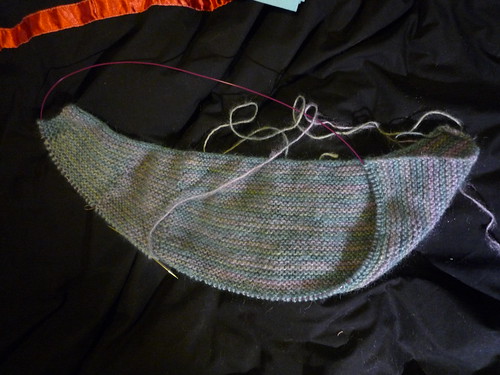
Half way point when I realised the bag would
be too big with the chart as written!
The resulting graph was lovely and twisty but that border needed sorting out.  So the next step, copy the graph into my go-to cross stitch program.  I did this by hand because the jpg of the maze generated had a watermark that I thought might confuse the pattern import.  Once that was done, I tweaked the design to make a seamless graph by removing the border and making some paths over the border and fixing a few bits for technical issues.  While I don't mind a 10-15 stitch float because I know I am going to line the resulting bag, I thought a 35 stitch float might be a bit long!  I actually have two different graphs, one of 40 charted rows, the other of 30.  This is due to me reaching the halfway point in my knitting and realising that my bag was going to be VERY deep if I followed the original pattern so I went back to my pattern and fiddled it a bit to make a shorter version.  Click on the chart to embiggen.


Now if you want to make this yourself, I would recommend two things- lots of stitch markers (I'm using one every ten stitches) and printing out the graph so you can cross off as you go.  I'm using the multi-pass technique described here at TECHknitting. Basically, on the first pass of a row, you knit all the stitches of one colour (eg green) and slip (purlwise to prevent stitches twisting) all the colours of the contrast colour (black).  After one round you go back with the OTHER colour and knit all the black stitches and slip all the green- so after two goes around you have done ONE row of knitting.  For this pattern, TWO rows of knitting are needed per charted row so that will mean four times around per charted row.  Confused yet?  Wait, there's more!

You also need to remember for knitting charts to start at the BOTTOM RIGHT of the chart and read from right to left.  Now this is not absolutely vital for this chart.  Your hero blogger managed to forget this crucial point and only realised several rows in.  Not wanting to have to frog the knitting, she shrugged and called it a mirror design feature.  But if you are doing a chart with letters, for instance, this important tip will prevent your letters and words being backwards.

The other important thing to be aware of is the yarn that is carried behind the knitting on the slipped stitches called floats.  In this pattern they are often very long in places- this is not recommended practise for clothing!  If this were a jumper or gloves your hands would get tangled in them constantly, they'd break and things would turn ugly very quickly.  There are ways to deal with this- there are techniques to fix them on long stretches (every 3-4 stitches is recommended in my reading) or they can be sewn into place after.  I'm not too worried in this project however as this is a bag and I intend to line it with material anyway to prevent things like pencils or knitting needles from poking out the side.  Just make sure to leave enough slack in the float so bag is not so tiny so as to be suitable for carrying only long skinny knitting needles!

Keep going until the end of the chart.  Knit one more row.  To finish the bag I followed the original  Creeping Jenny instructions from the eyelet row to the end.

Here's the results before blocking.  I'm hoping the weather will be nice tomorrow so I can block this baby and finish it off including a lining and eyelets.  See here for how I made a lining for the bag.
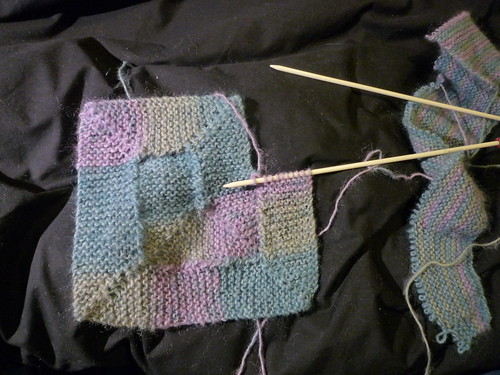
This side shows the middle of the pattern

This side shows the two ends of the pattern.  If you look very closely you may be able to see the slight stager from going from one round to the next.  However the difference is slight and should disappear with some careful blocking.

If you use the chart to make a bag or something else then please let me know!  I'd love to see what it looks like in different colours.  Feel free to use this chart and any other on this blog for your own purposes, just don't sell them.

Wednesday 30 November 2011

Tatting update and simple lace pattern to try

Second tatting class was last Friday and we started making a simple lace edge for a white handkerchief.  This is a very simple pattern- a variation of it was in one of Mum's tatting books that I tried as one of my first practice pieces.  If you are a beginner then this is a great one to start with- simple enough to remember and also easy to keep track of where you are so you can pick it up and put it down as a project without having to spend 10 minutes working out where you are up too.  And as you might guess, the plan is to attach the lace to the hankie after making it.  And no, the safety pin attachment plan is not my permanent solution, I just wanted to make sure I didn't twist the lace when joining the the end back to the start!


I'm writing this using what I think is the most common  current tatting notation (some very old patterns write things out in full- cor!) but feel free to leave a comment to ask any questions or correct my mistakes!  For beginners like me, numbers refer to double stitches needed with dashes meaning you need to add a picot (unless otherwise indicated in a pattern just do whatever size looks right for you- and try to be consistent as you go!).

Simple tatted lace edge
Use one shuttle
Ring 1:  5-5-5-5, close ring
*Leave a gap of about a 1 cm (or approximately the diameter of your first ring) and start the second ring: 5, join to 3rd picot of previous ring, 5-5-5, close ring.

Repeat from * for as long as you like for the straight part of the lace. 

For corners, form the corner ring don't leave a gap between the previous ring but form the ring hard up against it.  Form the ring the same way (5, join to 3rd picot of previous ring, 5-5-5) or make picot as below for a more decorative look. For the next ring (straight part again), again form this ring hard against the previous corner ring.  By not leaving the gap on either side of the corner rings, you'll find your lace will form a natural right angle corner.

Variation for corners (or use this for all rings is you like!).  Note, -- means to make one picot that is larger than normal.
Ring: 5, join to 3rd picot of previous ring, 5-1--1-5-5, close ring

Thursday 24 November 2011

Alice wristees

When browsing my ravelry queue in search of something to make, I came upon the wonderful White Rabbit wristees (think something similar to a glove with no thumb and no fingers- it covers your thumb and palm).  Despite the fact I am technically not allowed to buy wool, I had to make these- which meant I had to buy two balls of Rowan kidsilk haze.  Wonderful wool (totally unbelievably soft and fuzzy) and the colours work together brilliantly.  All I have to do is find a few pretty little buttons to add to finish them off.

Alice wristees
So a few tips if you are planning on making it yourself:
  • Make sure your cast on and off are nice and loose.  I used a long tail cast on but for the first wristee I made was a bit too tight, the second one I made looser and it's much easier to pull that one on.
  • I might also make it a bit longer (so further down the wrist) if I made it again- just work another inch before doing the increase. This is a personal taste/ hand size thing so you may or may not want to follow this advice!
  • And finally, don't make these at the start of summer, where ever you are, since I'm going to have to pack them away for cool weather *sigh*

Friday 18 November 2011

Tatting- a new craft for me

I'm rather excited to have just started learning a brand new craft- tatting.  Unlike many other crafts I've tried over the years, I'm actually doing a class to learn the basics.  Two hours a week for the next four weeks.

Today was just learning the basic knot and loop.  It's really fiddly and hard when you first try this!  Trying to work out what thread should be where and what the tension should be and such.  But by the end of the class I was going great guns.  You can see my increase in skill as you follow the loops along the thread below (top left is the first successful loop)
First loop- top left, then follow the thread to find my increase in skill/practice
Still, it was a bit of a bummer that the speed of the group meant that that was all I could do by the end of the class- the instructor was busy with the others in the class who were struggling to get the right knot*.  So when I got home I stole borrowed a few books from my Mum who had tried to get the hang of tatting years ago and good old google.

So far all I've managed are picots (little loopy bits) and a join (and I think I'm doing something funny with my joins, they seem to be a little twisted?).  Still, this looks like proper lacy stuff, don't you think?
Anyone know of any simple patterns that are good for a beginner to practice with?  I don't want to try anything involving two shuttles or chains yet until I'm in the presence of a professional with scissors to cut me free in case of emergency :P


*I've discovered in tatting that knots are easy- very, very, very easy!  It is the right sort of knot that is tricky.

Wednesday 16 November 2011

Sometimes the yarn just isn't right

I'm having delayed buyer's remorse.  Many years ago I bought some yarn because I was just getting into knitted lace.  I found some Moda Vera Celinda, a blended yarn (there are FOUR different materials according to the tag- and that doesn't count the glitter).  It felt lovely and soft and the glitter in it sparkled in a way that said 'you know you want me...'  (all knitters will recognise this voice from yarn shops!)

Many balls found their way home- enough for a full shawl.  But I had other things going at the time, including a large knitted shawl, so the balls went into the stash.  Years pass and I occasionally pulled one out for a pat but then decide to do something else so put them back.

Then came the stash-busting season of 2011.  After completing my car blanket I was on the prowl for something else to do using the stash and thought lace might be a plan.  Since much of my lace weight stuff is still in skeins and the swift and ball winder I bought on ebay is still in transit, that ruled out much of the stash contents.  But then a glimmer of light caught my eye- this could be Celinda's time to shine (or sparkle).  I pulled out a ball, spent several hours prowling patterns and finally decided to christen the book 'Victorian Lace Today' by Jane Sowerby, a gorgeous book with many lovely pattern as well as some history and brilliant design tips and instructions.  The scarf is a simple diamond lace for the middle, followed by a knitted lace edge.

The invisible cast on was the first hurdle, but youtube eventually sorted me out in that regard and I was off and away.  Now, 15 cm into the scarf body and I'm not loving the results.

Diamond lace scarf WIP
The lace is lovely (possibly a bit wide for a scarf- the width is 30 cm without the edge or blocking) but it is the yarn that is the issue.  The camera can't pick up glitter well but there is a lot of it- instead of a tasteful hint here and there, like fairy dust glimmering, it sparkles garishly as if a hyperactive three year old had found her crafting mother's glitter stash.  The yarn is also horrible to use- the two strands that make it up split constantly and bunch up.

Closeup of Moda Vera Celinda yarn
You can see in the photo the yarn thread splitting- now imagine that under tiny differences in tension as you knit resulting in ugly thread bunches in the fabric.

All in all, this is a project that will never be completed and will instead go to the frog pond, with a dose of charity shop for the yarn.  There is bound to be someone out there who loves this yarn but that person is not me.

Tuesday 15 November 2011

Julliette update

I spent much of today working on my Julliette scarf.  It is basically made of lots of little granny squares of different sizes made from DMC Perle Coton that are then sewn together.  I made quite a few more squares and I also spent some time sewing some of those squares together- you can see from the picture below that leaving all the sewing to last would not be a fun idea.

Julliete scarf WIP
Besides, this way I can see how the progress is going and can see and appreciate all the pretty colours.  If I make the scarf to the original pattern size, it is currently about 20% complete. Looks like I have a lot more squares to crochet!

Saturday 12 November 2011

Stash-busting car blanket finished


P1020195
There, not bad for 12 days work. Of course, that's 12 days of fairly solid knitting and no other craft projects to speak of (well I did finish a few other little things off but as it's for a secret Hogfather present I have to wait to post about them).   I ended up taking a photo in the garden because the reflections off the glass means the in situ photo would've looked rubbish.  And because I didn't finish this until nearly 5 pm on a lovely sunny afternoon, the only bit of sun I could find in the garden was a little dappled.  Still, the colours are lovely (the blue matches my car) and now I can sit back and work out what my next project will be.

The pattern was nice and simple- perfect for sitting and knitting on autopilot while reading. The corners are a little annoying at first but after the first one or two become easy to 'read' so are not too hard, just a little fiddly.  And you have to do less of them to straight bits the more the blanket grows so they become a little exciting as indicators of the blanket growing.  And even better- I lucked out with the amount of yarn so didn't get nearly to the end of a side only to find I wouldn't have enough and would have to frog.  Yay!  The only bummer is that the last ball had been wound in reverse to the other 7 balls?  Anyone else found that happen with a commercial yarn with a slow colour change?  Because I know I would be really ticked if I had been making a garment for example and found that one sleeve stripped the opposite way to the other.

In other news, I signed up for a tatting class next that starts next week.  I'll post the results, provided I have not tied my fingers together so I can't type!

Saturday 5 November 2011

Stumpwork- my first ever project

OK, this post is just a little brag.  I've just finished (mounted and everything) my very first stumpwork project.  Since it was also one of the first embroidery projects I've done (before this I was mainly a cross stitcher) it meant that from the start I was learning many new skills (thank goodness for embroidery stitch books!).

I bought this as a kit several years ago at a big Craft Fair.  I love the little details in it- the little bees are only a few millimetres across and yet so adorably cute!

The pattern is called 'Garland of Flowers', designed by Jane Nicholas and appeared in Inspirations magazine, Issue No 38 if you are interested in doing one of your own.  I can attest that even if you are a complete beginner at stumpwork, this design is possible.

Thursday 3 November 2011

Cute owls for kntted projects and how to make your own motifs

While mucking around with some ideas I decided to try making a little owl to swiss darn onto a project.  It was an interesting challenge and I thought I would share the process in case someone wants to try it themselves.

Step 1 is to find some suitable graph paper.  Knitted stitches are not square the way that cross stitch fabric.  This means that if you use square graph paper to make your design, it will appear squashed when used on knitting.  Fortunately, there are many options available online.  I went with a great website, ABCs of Knitting, that gives the option of creating customisable graph paper (click on the 'Actual Sized Graph paper' under Software Library in the menu on the left of the page).  If your project you want to embroider is already made, measure the number of rows and stitches per 4 cm- mine was 12 x 16.  I printed the resulting graph paper and used it to create real size designs- this also has the advantage of being able to check the size on your knitted object, but more on that later.

Step 2 is to make your designs.  I had had fun playing around with ideas in a sketch book so I tried a few ideas out.  As you can see, while I first thought of trying to do a tree would be nice, my first attempt didn't really work because of the scale involved.
So I tried a different approach and made a little owl (I love owls!) 

Since I wasn't sure what size would work best I made two, one slightly larger than the other.  And here is the sneaky part- by cutting out the design, I can then place it onto the project to see exactly how it will look before picking up a needle.
Of course now I've done so, I'm still not sure which one I will use.  And due to other issues (let's just say I'll talk about it more in a future blog post!) I may end up frogging part of my secret knitted project and end up doing something totally different.

But since the owls are cute, here is the pattern in case someone else wants to use them (if you do, I'd love to see a picture!)  I've made it in a cross stitch program, which is why they will look a bit tall and skinny.
Small Owl Knitting Motif

Larger Owl Knitting Motif


Tuesday 1 November 2011

Stash-busting Attempt #2- Car blanket

I tried, but I just could not see me ever wearing Corinne.  The yarn just doesn't do anything for me.  But that meant that it would be true for ANY garment I made from the yarn (and I don't know anyone who would value a knitted garment enough to put hundreds of hours of work into something I don't like).

So here is a final view of Corinne before it goes to the lilly pad in the sky.  You can see how the short rows are starting to shape the garment (top is to the left, front left side is the top).

Corinne just prior to frogging

Instead I am going to make a blanket for my car.  It's simple- I'm using the Ten Stitch Blanket pattern.  It's useful- I find having a blanket of any sort along the back window makes it much easier to find your car in a large parking lot, particularly if your car model and colour is a popular one!) And it is the perfect use for yarn that you are not fussed about- while I know from experience that acrylic baked in a car window for 5+ years will get a little yuck, the fact that this is only 50%, plus the fact that I just want to do something to make a nice big hole in my stash.

So here is the progress so far- one afternoon's knitting (it was that or do some cleaning and sorting but I have a cold so need to rest :P ).  Nice and simple on the straight bits and not too complicated on the corners.  Keeping the length of the straight is a little tricky but I think that it won't be too much of a problem as it gets bigger (one row off is a reasonable % of the inner sections but only a drop in the ocean for a longer straight section further out).  And the yarn knows I don't love it- despite the fact that mohair is notorious for being a pain in the butt to frog, this one is acting like it is a plain yarn!  It knows that at the first sign of trouble I'm going to cut it off and toss it vs waste hours of life and grey hairs in untangling it.

Ten Stitch Blanket

Monday 31 October 2011

Stash-busting Corinne

While I have many projects on the go right now, I didn't have any nice simple knitting to do.  I like to read forums and blogs while doing mindless knitting so I had to find a project.  I also want to make a dent in the wool stash so I found some Cleckheaton Studio Mohair, an 8 ply acrylic/mohair blend I bought years and years ago.

I'm not sure why I bought it looking at it now.  While I guess it's pretty in a way, I'm not a big fan of fluff which is kind of the definition of mohair yarn!  The colours are a bit pale too- sort of a bluey green with pink sections.  The point being, it was hard to find a pattern, and harder still to know if I'll like the finished result!

Chekheaton Studio Mohair

I ended up settling for Corinne, a Knitty pattern, for two reasons.  One is that I don't want to spend money on a pattern when I may not like the finished result due to the yarn (and I hate knitting the same pattern twice).  The other is that while the knitting is about as simple as it can get, the construction is interesting being a sideways knitted garment.  I like the idea and am interested to see how the shaping works.

So here is the result of the first day of knitting.  I have 9 more repeats of the side row increases before I hit the sleeves so this will take me a while.  But it's about as mindless as you can get since it's made in garter stitch with short row increases for the shaping!

Corinne started

Sunday 30 October 2011

Return to regular posting soon

Sorry for my thousands of fans out there (she says facetiously!) but I've been crazy busy with the last bits of my uni course.  But is now done, finished and completed!  I'm now qualified to be a teacher in my state (woot!)  With the end of my course, I will soon have lots of lovely free time to do crafty things in.  Well, with the exception of planning a move to the country for my new job that will start with the new school year.  But on the plus side- new job!

So in the short term, expect more crafty goodness with occasional wibbling from yours truly as the reality of moving sets in!  I've more posts coming so stay tuned!  And anyone who has some advice about moving, feel free to drop me a comment.

Friday 14 October 2011

Nine block quilt- first two blocks

I've always admired quilts but up until now I've not tried making anything much myself.  But now I have a sewing machine that is not evil and I have a friend with a online fabric shop (Bella's Patchwork) with lots of pretty fabrics, I've no excuses (well aside from the lack of time, money and having lots of other crafting projects on hand already but they're merely minor details!)

I bought a book 'Quilting for the first time' by Donna Kooler.  It covers all the basics and covers a range of common techniques used in quilting.  Now in theory, one should take a book like this and start at the first projects, developing skills in the simpler projects before attempting the more complex projects.  But I'm can never be bothered with the first projects generally.  They are often for things that I would never want or use in a blue fit.  I do NOT like 'country kitch', which I'm afraid many of these projects often remind me of.  Or I just get caught by a lovely pattern towards the back.

This book was no exception, the project that caught me was the last of the book- a miniature quilt (about 1m square when finished) that is made of nine different traditional quilt blocks.  I figure it isn't TOO outrageous a first project since it does allow me to learn many different techniques.

Step one was to work out what fabric to get and it's hard!  Trying to work out what to get and what colours to use- tricky stuff.  I ended up getting several patterns of Moda's whimsy series since at this early stage, I can use all the help I can get.  Using the one manufacturer and series meant that all the colours should match.  I also got a small 'charm pack'- pack of 5 inch square pieces of material- because I thought that I could use some for smaller bits (but I don't know now I'm cutting out pieces how sucessful that will be).

But right now I've got a big pile of fabric to play with, and I hope it's enough (or I can get more before the end of the range!)  To date I've only cut out material for two of the nine blocks.  Here are the blocks and the book I'm using.
The pinwheel was fairly simple to sew (I started with it first for just that reason.

The Bearpaw block was harder- it turns out that (to my amatuer skills anyway) that there was a mistake in the book with the size of one of the blocks wrong (too long in one side by one seam length), plus trying to get the triangle squares in the right orientation took several tries.
Still, it's a good start. The cynic in me thinks that is because things will go wrong at the end when it's much harder to put right but hey, at least it means I can have fun in the mean time with nothing going wrong *ducks cautiously*  Now I need to work out what colours the next blocks will be so I can cut out bits of fabric... man, quilting is hard!

Wednesday 12 October 2011

Mutant squares- aka flowers!

As a beginner to crochet, there are many many things I am still learning.  I'm still at the stage where I need to go look up what a stitch is.  And there I hit my first problem- not everyone speaks the same language when it comes to crochet.  Specifically, there is a difference in terms between those from the UK and those from the US.  Below is a table that compares the terms (from about.com's very useful page)
British vs American English Crochet Patterns
British English USA - American English
double crochet (dc) single crochet (sc)
half treble (htr) half double crochet (hdc)
treble (tr) double crochet (dc)
double treble (dtr) treble (tr)
triple treble (trtr) double treble (dtr)
miss skip
tension gauge
yarn over hook (yoh) yarn over (yo)
See the problem?  If your pattern asks for trebles and double crochet's like mine, what stitch should you do?  Now if your pattern is known to have come from one of these lovely places, no worries.  But I'm not sure if the rule holds if your pattern comes from Australia (and possibly Canadians have the same problem).  Here in Australia we have a bit of a mixture when it comes to influences.  Being a former colony of the UK, there is a strong UK influence in our spelling for instance (colour, optimise, aluminium are just a few examples).  But a significant proportion of books, tv shows and movies come from the US.

So when I first started the Juliette scarf I took a guess as to what to do- and I choose poorly.  Instead of little squares I ended up with this:
Mutant squares

This should not be taken as a slur on the pattern- even with my confusion about terminology I had to make a major mix up to get what I got.  But on the plus side, the small ones look like pretty flowers, don't they?  Once I realised what was wrong I frogged some of these to recycle the thread (that DMC Perle cotton is lovely but not the cheapest stuff in the world).  But two I didn't have the heart to so I gave them to Mum for card embellishments (they would also look pretty as decoration on a garment or perhaps a hair clip).

So here are my instructions for making mutant squares- also know as little crochet flowers.  I am going to use UK stitch terminology.

Make a chain of four and join the ends together to form a loop.
Round 1
Make a chain of three (this counts as one treble) and then stitch 12 trebles into the loop you made.  Join with a slip stitch into the third chain of three to make a circle of crochet.
Break off yarn and change colour for next round
Round 2
Make a chain of four. * Into the next treble of the previous round make two trebles and a double crochet, into the next treble make one double crochets and two trebles.  Make on treble in the next treble**  Repeat from * to **  twice.  In the second last treble make two trebles and one double crochet.  In the last stitch make one double crochet and two trebles and join to third chain of three to make a round.

Sew the ends in and you have your flower.  Hope this makes sense- since I am a near beginner at crochet I apologise in advance if the pattern is confusing.  Feel free to email me or leave a comment if you would like anything explained.

Tuesday 11 October 2011

Julliette crochet scarf beginings...

With my owls now finished it's time to find a new project.  What with me being me, there are about five actively in the queue with many more that are sort of sidling in and hoping no one makes a fuss.

This project is one that I bought in 2010 at the Melbourne Craft fair but I can't find it available anywhere online.  It is a crochet project, a craft I'm only just getting into, and is basically lots of granny squares of different sizes made from DMC Perle Coton that are then sewn (or crocheted- have not decided yet) together to make a scarf.  Below is the kit and the squares that I have done so far.  I love the colours.  Not in your face bright but not all pale pastels either.

Juliette scarf beginings
The only downside is that crochet is not a task I can do without looking the way that knitting is (especially plain knitting). So while I can knit and read at the same time, I can't crochet and read. I can crochet and watch TV though so this will become my 'sit and watch TV project' while I will still need a 'sit and read' project. And then there are sit and just do craft projects... Me, addicted? 

Anyway, this is going to be a project that takes some time.  The advantage of making lots of squares is that it will be a good project to pick up and put down without risk of loosing track of where I am.  The only other think I need to worry about is how to join my squares and when to start- on one hand having all the squares done will mean I can optimise the colour placement.  But on the other hand, that will make a BIG slog when it comes to putting it together.  I think I'll make sections at a time- I've got about enough squares to start so I'd better go and work out my joining technique.