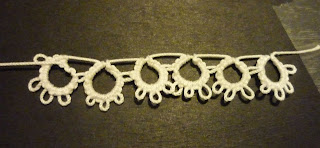
Second tatting class was last Friday and we started making a simple lace edge for a white handkerchief. This is a very simple pattern- a variation of it was in one of Mum's tatting books that I tried as one of my first practice pieces. If you are a beginner then this is a great one to start with- simple enough to remember and also easy to keep track of where you are so you can pick it up and put it down as a project without having to spend 10 minutes working out where you are up too. And as you might guess, the plan is to attach the lace to the hankie after making it. And no, the safety pin attachment plan is not my permanent solution, I just wanted to make sure I didn't twist the lace when joining the the end back to the start!
I'm writing this using what I think is the most common current tatting notation (some very old patterns write things out in full- cor!) but feel free to leave a comment to ask any questions or correct my mistakes! For beginners like me, numbers refer to double stitches needed with dashes meaning you need to add a picot (unless otherwise indicated in a pattern just do whatever size looks right for you- and try to be consistent as you go!).
Simple tatted lace edge
Use one shuttle
Ring 1: 5-5-5-5, close ring
*Leave a gap of about a 1 cm (or approximately the diameter of your first ring) and start the second ring: 5, join to 3rd picot of previous ring, 5-5-5, close ring.
Repeat from * for as long as you like for the straight part of the lace.
For corners, form the corner ring don't leave a gap between the previous ring but form the ring hard up against it. Form the ring the same way (5, join to 3rd picot of previous ring, 5-5-5) or make picot as below for a more decorative look. For the next ring (straight part again), again form this ring hard against the previous corner ring. By not leaving the gap on either side of the corner rings, you'll find your lace will form a natural right angle corner.
Variation for corners (or use this for all rings is you like!). Note, -- means to make one picot that is larger than normal.
Ring: 5, join to 3rd picot of previous ring, 5-1--1-5-5, close ring
Wednesday 30 November 2011
Thursday 24 November 2011
Alice wristees
When browsing my ravelry queue in search of something to make, I came upon the wonderful White Rabbit wristees (think something similar to a glove with no thumb and no fingers- it covers your thumb and palm). Despite the fact I am technically not allowed to buy wool, I had to make these- which meant I had to buy two balls of Rowan kidsilk haze. Wonderful wool (totally unbelievably soft and fuzzy) and the colours work together brilliantly. All I have to do is find a few pretty little buttons to add to finish them off.
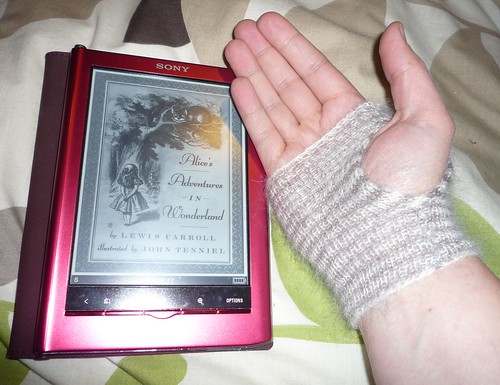
So a few tips if you are planning on making it yourself:

So a few tips if you are planning on making it yourself:
- Make sure your cast on and off are nice and loose. I used a long tail cast on but for the first wristee I made was a bit too tight, the second one I made looser and it's much easier to pull that one on.
- I might also make it a bit longer (so further down the wrist) if I made it again- just work another inch before doing the increase. This is a personal taste/ hand size thing so you may or may not want to follow this advice!
- And finally, don't make these at the start of summer, where ever you are, since I'm going to have to pack them away for cool weather *sigh*
Friday 18 November 2011
Tatting- a new craft for me
I'm rather excited to have just started learning a brand new craft- tatting. Unlike many other crafts I've tried over the years, I'm actually doing a class to learn the basics. Two hours a week for the next four weeks.
Today was just learning the basic knot and loop. It's really fiddly and hard when you first try this! Trying to work out what thread should be where and what the tension should be and such. But by the end of the class I was going great guns. You can see my increase in skill as you follow the loops along the thread below (top left is the first successful loop)
Still, it was a bit of a bummer that the speed of the group meant that that was all I could do by the end of the class- the instructor was busy with the others in the class who were struggling to get the right knot*. So when I got home I stole borrowed a few books from my Mum who had tried to get the hang of tatting years ago and good old google.
So far all I've managed are picots (little loopy bits) and a join (and I think I'm doing something funny with my joins, they seem to be a little twisted?). Still, this looks like proper lacy stuff, don't you think?
Anyone know of any simple patterns that are good for a beginner to practice with? I don't want to try anything involving two shuttles or chains yet until I'm in the presence of a professional with scissors to cut me free in case of emergency :P
*I've discovered in tatting that knots are easy- very, very, very easy! It is the right sort of knot that is tricky.
Today was just learning the basic knot and loop. It's really fiddly and hard when you first try this! Trying to work out what thread should be where and what the tension should be and such. But by the end of the class I was going great guns. You can see my increase in skill as you follow the loops along the thread below (top left is the first successful loop)
 |
| First loop- top left, then follow the thread to find my increase in skill/practice |
So far all I've managed are picots (little loopy bits) and a join (and I think I'm doing something funny with my joins, they seem to be a little twisted?). Still, this looks like proper lacy stuff, don't you think?
Anyone know of any simple patterns that are good for a beginner to practice with? I don't want to try anything involving two shuttles or chains yet until I'm in the presence of a professional with scissors to cut me free in case of emergency :P
*I've discovered in tatting that knots are easy- very, very, very easy! It is the right sort of knot that is tricky.
Wednesday 16 November 2011
Sometimes the yarn just isn't right
I'm having delayed buyer's remorse. Many years ago I bought some yarn because I was just getting into knitted lace. I found some Moda Vera Celinda, a blended yarn (there are FOUR different materials according to the tag- and that doesn't count the glitter). It felt lovely and soft and the glitter in it sparkled in a way that said 'you know you want me...' (all knitters will recognise this voice from yarn shops!)
Many balls found their way home- enough for a full shawl. But I had other things going at the time, including a large knitted shawl, so the balls went into the stash. Years pass and I occasionally pulled one out for a pat but then decide to do something else so put them back.
Then came the stash-busting season of 2011. After completing my car blanket I was on the prowl for something else to do using the stash and thought lace might be a plan. Since much of my lace weight stuff is still in skeins and the swift and ball winder I bought on ebay is still in transit, that ruled out much of the stash contents. But then a glimmer of light caught my eye- this could be Celinda's time to shine (or sparkle). I pulled out a ball, spent several hours prowling patterns and finally decided to christen the book 'Victorian Lace Today' by Jane Sowerby, a gorgeous book with many lovely pattern as well as some history and brilliant design tips and instructions. The scarf is a simple diamond lace for the middle, followed by a knitted lace edge.
The invisible cast on was the first hurdle, but youtube eventually sorted me out in that regard and I was off and away. Now, 15 cm into the scarf body and I'm not loving the results.
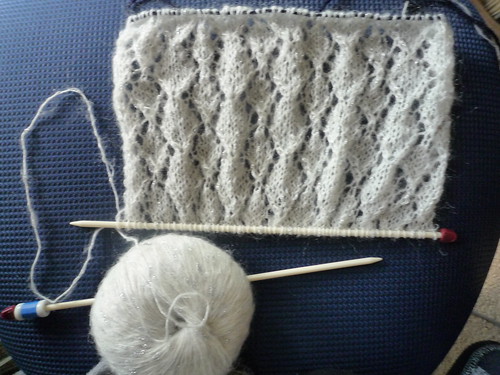
The lace is lovely (possibly a bit wide for a scarf- the width is 30 cm without the edge or blocking) but it is the yarn that is the issue. The camera can't pick up glitter well but there is a lot of it- instead of a tasteful hint here and there, like fairy dust glimmering, it sparkles garishly as if a hyperactive three year old had found her crafting mother's glitter stash. The yarn is also horrible to use- the two strands that make it up split constantly and bunch up.
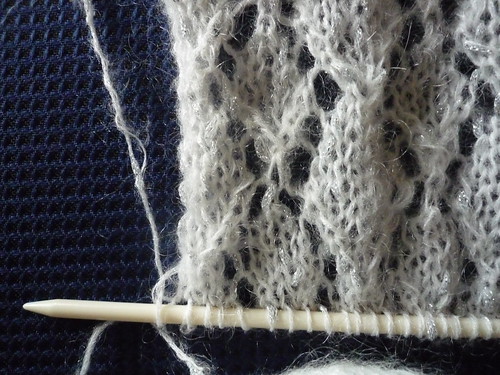
You can see in the photo the yarn thread splitting- now imagine that under tiny differences in tension as you knit resulting in ugly thread bunches in the fabric.
All in all, this is a project that will never be completed and will instead go to the frog pond, with a dose of charity shop for the yarn. There is bound to be someone out there who loves this yarn but that person is not me.
Many balls found their way home- enough for a full shawl. But I had other things going at the time, including a large knitted shawl, so the balls went into the stash. Years pass and I occasionally pulled one out for a pat but then decide to do something else so put them back.
Then came the stash-busting season of 2011. After completing my car blanket I was on the prowl for something else to do using the stash and thought lace might be a plan. Since much of my lace weight stuff is still in skeins and the swift and ball winder I bought on ebay is still in transit, that ruled out much of the stash contents. But then a glimmer of light caught my eye- this could be Celinda's time to shine (or sparkle). I pulled out a ball, spent several hours prowling patterns and finally decided to christen the book 'Victorian Lace Today' by Jane Sowerby, a gorgeous book with many lovely pattern as well as some history and brilliant design tips and instructions. The scarf is a simple diamond lace for the middle, followed by a knitted lace edge.
The invisible cast on was the first hurdle, but youtube eventually sorted me out in that regard and I was off and away. Now, 15 cm into the scarf body and I'm not loving the results.

The lace is lovely (possibly a bit wide for a scarf- the width is 30 cm without the edge or blocking) but it is the yarn that is the issue. The camera can't pick up glitter well but there is a lot of it- instead of a tasteful hint here and there, like fairy dust glimmering, it sparkles garishly as if a hyperactive three year old had found her crafting mother's glitter stash. The yarn is also horrible to use- the two strands that make it up split constantly and bunch up.

You can see in the photo the yarn thread splitting- now imagine that under tiny differences in tension as you knit resulting in ugly thread bunches in the fabric.
All in all, this is a project that will never be completed and will instead go to the frog pond, with a dose of charity shop for the yarn. There is bound to be someone out there who loves this yarn but that person is not me.
Tuesday 15 November 2011
Julliette update
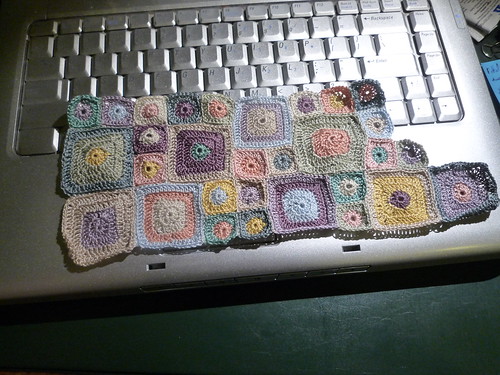
I spent much of today working on my Julliette scarf. It is basically made of lots of little granny squares of different sizes made from DMC Perle Coton that are then sewn together. I made quite a few more squares and I also spent some time sewing some of those squares together- you can see from the picture below that leaving all the sewing to last would not be a fun idea.
Besides, this way I can see how the progress is going and can see and appreciate all the pretty colours. If I make the scarf to the original pattern size, it is currently about 20% complete. Looks like I have a lot more squares to crochet!
Besides, this way I can see how the progress is going and can see and appreciate all the pretty colours. If I make the scarf to the original pattern size, it is currently about 20% complete. Looks like I have a lot more squares to crochet!
Saturday 12 November 2011
Stash-busting car blanket finished
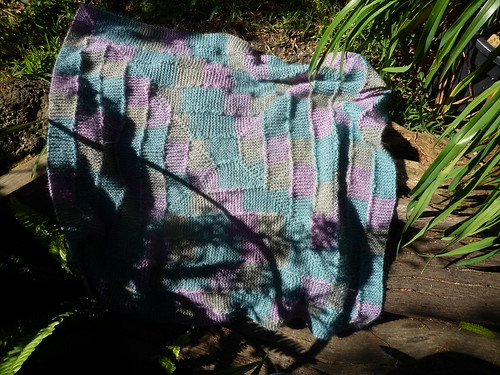
There, not bad for 12 days work. Of course, that's 12 days of fairly solid knitting and no other craft projects to speak of (well I did finish a few other little things off but as it's for a secret Hogfather present I have to wait to post about them). I ended up taking a photo in the garden because the reflections off the glass means the in situ photo would've looked rubbish. And because I didn't finish this until nearly 5 pm on a lovely sunny afternoon, the only bit of sun I could find in the garden was a little dappled. Still, the colours are lovely (the blue matches my car) and now I can sit back and work out what my next project will be.
The pattern was nice and simple- perfect for sitting and knitting on autopilot while reading. The corners are a little annoying at first but after the first one or two become easy to 'read' so are not too hard, just a little fiddly. And you have to do less of them to straight bits the more the blanket grows so they become a little exciting as indicators of the blanket growing. And even better- I lucked out with the amount of yarn so didn't get nearly to the end of a side only to find I wouldn't have enough and would have to frog. Yay! The only bummer is that the last ball had been wound in reverse to the other 7 balls? Anyone else found that happen with a commercial yarn with a slow colour change? Because I know I would be really ticked if I had been making a garment for example and found that one sleeve stripped the opposite way to the other.
In other news, I signed up for a tatting class next that starts next week. I'll post the results, provided I have not tied my fingers together so I can't type!
Saturday 5 November 2011
Stumpwork- my first ever project
OK, this post is just a little brag. I've just finished (mounted and everything) my very first stumpwork project. Since it was also one of the first embroidery projects I've done (before this I was mainly a cross stitcher) it meant that from the start I was learning many new skills (thank goodness for embroidery stitch books!).
I bought this as a kit several years ago at a big Craft Fair. I love the little details in it- the little bees are only a few millimetres across and yet so adorably cute!
The pattern is called 'Garland of Flowers', designed by Jane Nicholas and appeared in Inspirations magazine, Issue No 38 if you are interested in doing one of your own. I can attest that even if you are a complete beginner at stumpwork, this design is possible.
Thursday 3 November 2011
Cute owls for kntted projects and how to make your own motifs
While mucking around with some ideas I decided to try making a little owl to swiss darn onto a project. It was an interesting challenge and I thought I would share the process in case someone wants to try it themselves.
Step 1 is to find some suitable graph paper. Knitted stitches are not square the way that cross stitch fabric. This means that if you use square graph paper to make your design, it will appear squashed when used on knitting. Fortunately, there are many options available online. I went with a great website, ABCs of Knitting, that gives the option of creating customisable graph paper (click on the 'Actual Sized Graph paper' under Software Library in the menu on the left of the page). If your project you want to embroider is already made, measure the number of rows and stitches per 4 cm- mine was 12 x 16. I printed the resulting graph paper and used it to create real size designs- this also has the advantage of being able to check the size on your knitted object, but more on that later.
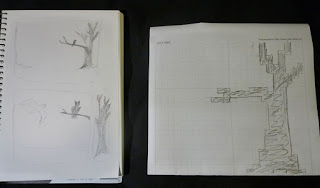
Step 2 is to make your designs. I had had fun playing around with ideas in a sketch book so I tried a few ideas out. As you can see, while I first thought of trying to do a tree would be nice, my first attempt didn't really work because of the scale involved.
So I tried a different approach and made a little owl (I love owls!)
Since I wasn't sure what size would work best I made two, one slightly larger than the other. And here is the sneaky part- by cutting out the design, I can then place it onto the project to see exactly how it will look before picking up a needle.
Of course now I've done so, I'm still not sure which one I will use. And due to other issues (let's just say I'll talk about it more in a future blog post!) I may end up frogging part of my secret knitted project and end up doing something totally different.
But since the owls are cute, here is the pattern in case someone else wants to use them (if you do, I'd love to see a picture!) I've made it in a cross stitch program, which is why they will look a bit tall and skinny.
 |
| Small Owl Knitting Motif |
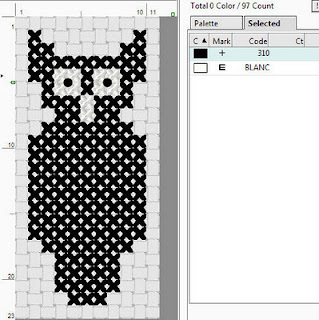 |
| Larger Owl Knitting Motif |
Tuesday 1 November 2011
Stash-busting Attempt #2- Car blanket
I tried, but I just could not see me ever wearing Corinne. The yarn just doesn't do anything for me. But that meant that it would be true for ANY garment I made from the yarn (and I don't know anyone who would value a knitted garment enough to put hundreds of hours of work into something I don't like).
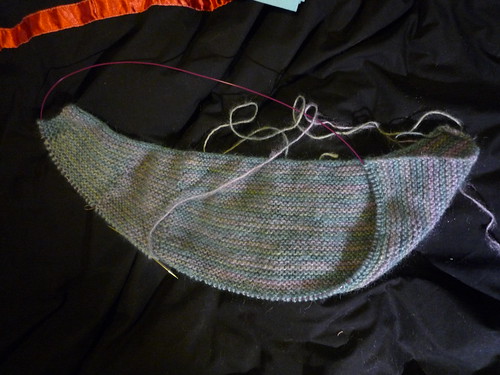
So here is a final view of Corinne before it goes to the lilly pad in the sky. You can see how the short rows are starting to shape the garment (top is to the left, front left side is the top).
Instead I am going to make a blanket for my car. It's simple- I'm using the Ten Stitch Blanket pattern. It's useful- I find having a blanket of any sort along the back window makes it much easier to find your car in a large parking lot, particularly if your car model and colour is a popular one!) And it is the perfect use for yarn that you are not fussed about- while I know from experience that acrylic baked in a car window for 5+ years will get a little yuck, the fact that this is only 50%, plus the fact that I just want to do something to make a nice big hole in my stash.
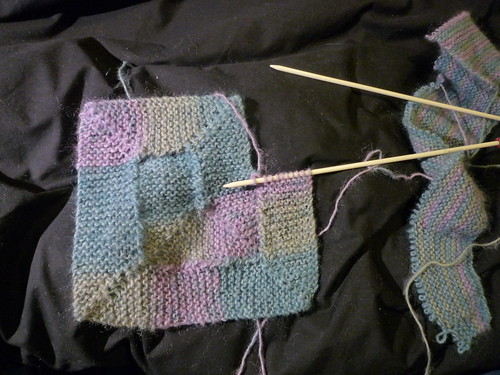
So here is the progress so far- one afternoon's knitting (it was that or do some cleaning and sorting but I have a cold so need to rest :P ). Nice and simple on the straight bits and not too complicated on the corners. Keeping the length of the straight is a little tricky but I think that it won't be too much of a problem as it gets bigger (one row off is a reasonable % of the inner sections but only a drop in the ocean for a longer straight section further out). And the yarn knows I don't love it- despite the fact that mohair is notorious for being a pain in the butt to frog, this one is acting like it is a plain yarn! It knows that at the first sign of trouble I'm going to cut it off and toss it vs waste hours of life and grey hairs in untangling it.
So here is a final view of Corinne before it goes to the lilly pad in the sky. You can see how the short rows are starting to shape the garment (top is to the left, front left side is the top).

Instead I am going to make a blanket for my car. It's simple- I'm using the Ten Stitch Blanket pattern. It's useful- I find having a blanket of any sort along the back window makes it much easier to find your car in a large parking lot, particularly if your car model and colour is a popular one!) And it is the perfect use for yarn that you are not fussed about- while I know from experience that acrylic baked in a car window for 5+ years will get a little yuck, the fact that this is only 50%, plus the fact that I just want to do something to make a nice big hole in my stash.
So here is the progress so far- one afternoon's knitting (it was that or do some cleaning and sorting but I have a cold so need to rest :P ). Nice and simple on the straight bits and not too complicated on the corners. Keeping the length of the straight is a little tricky but I think that it won't be too much of a problem as it gets bigger (one row off is a reasonable % of the inner sections but only a drop in the ocean for a longer straight section further out). And the yarn knows I don't love it- despite the fact that mohair is notorious for being a pain in the butt to frog, this one is acting like it is a plain yarn! It knows that at the first sign of trouble I'm going to cut it off and toss it vs waste hours of life and grey hairs in untangling it.

Subscribe to:
Posts (Atom)


