Sunday 28 December 2014

Small monthly desk calendar

At the end of November, there is the annual Hogswatch event for Discworld fans, in the little town of Wincanton, Somerset, England.  But for many fans, including myself, it's a little far to pop in and visit. So instead, several of us got together in a Skype chat and had our own fun.  I wrote* a lovely little quiz and made this little desk calendar as a prize for the winner.  It has a Discworld stamp theme with tear off pages but if you like bookbinding or scrapbooking you should enjoy this and can easily modify it for any theme you like.  It also folds flat which means it is a great present to post.

This post is going up 28th December so if you are sitting around the house, tired from the Boxing Day Sales (or avoiding the shops completly) it's a fun couple of hours (most of that time being design- decision making is hard!)
This small calendar has tear off pages and sits nicely on a desk or table

*well, stole questions from various places online

Materials

  • Various scrapbook papers 7.5 cm x 11 cm
  • One piece of light card 7.7 cm x 23.5 cm
  • Print out of months- I just googled '2015 calendar' and found something that would work for me.  If you are reading this post in a later year, obviously change the year to something suitable!
  • Decorative bits (my theme was a Discworld stamp calendar but you could go with anything you like)
  • Hole punch- smaller holes would work better but you could probably make do with a holepunch.
  • Pretty string (it will be visible and need to hold the calendar together so choose carefully)
  • Needle with an eye big enough for the string
  • Drill with small drill bit
  • Pretty button


Note- all the sizes are based on what I made, with minimal layers on each page.  If you make your pages with lots of layers/thickness you will need to adjust some of these dimensions, particularly for the cover.
Method
Step 1 is the hardest part- deciding what papers to use for what month!

Draw a faint line on the bottom of your calendar, 2 cm from the bottom.  Use this as a guide to make a row of holes for each page using the holepunch.  This is what will let you tear away months as they pass.  Spacing of the holes will depend on what size punch you have.  If you are worried, have a practice on a bit of scrap paper to see what is the best spacing to allow you to tear away later.

Layout and glue down the bits to make your calendar up.  Make sure you keep your work above the row of holes.

Now for the cover.  Take the card and score at the 2.5, 3, 14, 14.5 cm lengths (if your pages are thicker then adjust here accordingly).
Scoring the lines with a knife or a bone folder (note- not actually made of bone these days!) is crucial for crisp folds

Fold at the score marks and check if your pages fit into the cover correctly.
Horray, the pages fit in nicely!

Now to mark out the dots to drill with.  Exact measurements don't matter, provided things look symmetrical.  You want to make three holes in a triangle, with one dot in the middle and further from the bottom than the other two.  See the picture and you'll see what I mean.
Location of holes and numbered so you can follow the next bit.  Note my incredibly useful little hand drill
Use bulldog clips to hold everything together, cover and pages, while you drill the holes.  Another bit of scrap paper is useful to prevent marks being left on your cover.

Appearance after step 1
Now to sew it all together.  Take a long length of string (about a meter.  You won't use it all but it is much better to have too much than too little!) and thread it onto the needle.  To sew, refer to the diagram above to follow along with each hole:

  1. Starting from the front, go through hole 2 leaving a length of around 10 cm of string.  
  2. Go through hole 2 again from the front and pull tightly.
  3. From the back, bring the needle through hole 1 to the front, then loop the thread around the bottom and bring the needle through hole 1 again from back to front.
  4. Loop the thread around the left side of the book and through hole 1 again from back to front.
  5. Put the needle through hole 2 from the front and bring the thread around the left side to the front before putting the needle through hole 2 again from front to back.
  6. On the back, put the needle through hole three to bring it to the front.  Take the thread to the back around the base and back through hole 3 .
  7. Take the thread to the back again and through hole three.
  8. Bring the needle through hole 2 and you should have the pattern now completed.

Tie the threads off (a drop of clear nail polish is a good way to secure the knot) but leave about 10 cm of length for each.

The threads will be used to wrap around a button to hold the cover closed or open in place on a desk.  Just put the button onto the cover, use a pencil to mark where the holes are and punch out with a needle or holepunch.  Sew the button into place and tie string off at the back.

And you are pretty much done.  I prettied up the cover, just because I could but you could also leave it plain if you preferred.

Sunday 21 December 2014

Beaded Christmas tree update

Tis the season to bring the Christmas tree out.  Since I live in a small unit, a big tree is not going to happen so for the last few years, since I made it, I've had my beaded Christmas tree.

But see that ugly wire down there?  This year I decided to hide it away.  Now I could've just put stuff at the bottom to hide it but that wouldn't completely hide it as the lid would be problematic.  Instead I've gone a bit more posh and cut the wire to let me thread it where I would.

Step one was to make a hole in the box so it can be turned on/off from the outside.  I had a new box I was going to move the tree to as part of this process that was a bit taller so the battery pack fit in well.  A bit of scrap paper to rough out the shape of the end of the battery pack and the location of the switch and I had a template.
The template is upside down in the photo relative to the pack but oh well
The template then let me draw where I wanted the switch hole to be easily.
The final spot is on the left- the bottom is where I tried to freehand draw it and failed.
Using a craft knife I cut out a hole for the switch, making sure that it was long enough to let it be turned on and off.

Next step is the lights.  LED stands for Light Emitting Diode and the diode part of that means that they only work when the current is passing through the correct direction. If you have the poles around the other way nothing will happen.  So I used a black marker to colour one of the wires in so when cut I could tell which end went with which.
The wire is coloured in so I can identify it later- I'm using a different set of lights for this part to make it easier to follow
Then cut the wire using wire cutters and strip the ends.

Wires cut and stripped- note the bottom two are coloured black for easy identification.
Before doing anything else, checking things are still good is useful- just hold the bare metal of each wire together and see if it lights up (note- this should ONLY be done for low powered battery lights, not something running off mains!)
Yep, still works
I had to remount the tree into the box so that meant making four holes for the trunk of the tree (four rigid metal wires bound together with florist tape) and an extra hole near the trunk for the lights wire to pass through).  Once things were stable in the box lid it was time to fix the base up.

Place the battery pack into the box so the switch is in the correct place.  I used tape initially but will go back later with hot glue as I am finding the pack is moving just enough to make using the switch annoying.
Interior of the box showing the battery pack in location and my lovely wire connections (real electricians should probably turn away here)
Inside, check that you have the wires around the correct way again (it's only paranoia if the universe is NOT out to get you!) and then join the wires- a light twist then lots of electrical tape is my method of choice.  Just a light twist mind you- too much and you'll break the individual wires.  And the tape is important as it will prevent any short circuit occurring which could kill the lights, tree or batteries or all of the above.  You should also check that there is enough length in the wire to allow you to place the lid on a table next to the box easily.  Otherwise you'll be trying to hold the tree while also replacing batteries and that's just annoying.

That's pretty much it.  Not fancy but it does make for a nice tree.
Look at that base- isn't it nice with no wires!
Happy Christmas everyone.

Saturday 13 December 2014

Holidays!

Horray!  It's the most wonderful time of the year!  Not because of Christmas, but because I am now on HOLIDAYS!   *runs around madly flailing arms like Kermit*

I've been very productive so far.  Well, I've left the house, which is kind of like being productive.  Went to Bunnings to look for a Christmas present for my sister. I sadly didn't find what she wanted but I did buy some lavender to replace the one that kind of... died.  Turns out that plants need water... go figure.

Anyway, I also used a 15% off voucher I had for Spotlight for something that may feature in a future post, bought some shoes (exciting, I know!) and wandered around a market that was on in town.

Then I had my LIFE THREATENING EXPERIENCE!  *dramatic music would play here if it wasn't for the fact it would be a) a pain to do and b) break rule one of the internet and force someone to listen to a webpage*

Living up here in rural Victoria, I knew that redback spiders were much more common than in suburban Melbourne.  But after three years, I started to figure that it was more an issue if you were out on the edges of town.  At least until I moved a pot of dead lavender (see above) and saw a FREAKING ENORMOUS ONE!!!!
Run away! Run away!  And yes, my first instinct on seeing my first wild redback spider was to take a photo- after being satisfied it wasn't about to leap over and eat me.  I blame the internet.
Several meters in width... Um, the camera makes it seem smaller...  Anyway, lets just say that my initial plan of potting up the new lavender was deferred as I lost my interest in gardening at that point.  That and I'd forgotten I had run out of potting mix...

So anyway, I'm back and I have lots of ideas battling it out in my head and already have a few half done projects I'm working on to post here so expect a return to regular posting.

Stay safe everyone! 


Saturday 11 October 2014

Gilt lettering and more Discworld stamp yearbooks

It's only been a week and already the school holidays seem a distant memory.  Thanks to a rotten bug, I didn't get as much relaxing crafting done as I wanted but I did manage to play with something I bought years ago.

One of the things I always wished I could do with the books that I create was to make good looking, crisp, gold lettering.  Metallic pens just don't do the job in my experience- they don't shine the way that metal does and the majority of pens just don't go fine enough (the finest one I have is a 0.3mm tip).  But years ago I came across Hugh Spark's webpage which talked about using a product that lets you print with a laser printer, gilt those letters and then transfer that to anything you like as a decal.  The stuff used I bought from Pulsar Pro FX (website was working a few weeks ago but now seems to be down?).

I followed Hugh Spark's instructions and for the most part, it worked well.  There most definitely a learning curve, and there are a lot of steps where things can go wrong.  But after battling the gremlins, I managed to make these...

These were all created as presents for friends.  As you can see, not all had the same spine contents thanks to the decal not always surviving intact to the end of the process!  But it worked well enough and enough survived that I was pleased with what I produced, particularly compared to previous methods.

And after doing all that, I had to get around to making my own.  The observant among you will notice that I have cheated with years and am not making these in year order at this point.  I do plan to fill in those gaps, but I also wanted to have somewhere to put the stamps that I am only lightly collecting again...  *wimper*  I can stop any time I want to... 


Sunday 10 August 2014

A few bits and bots

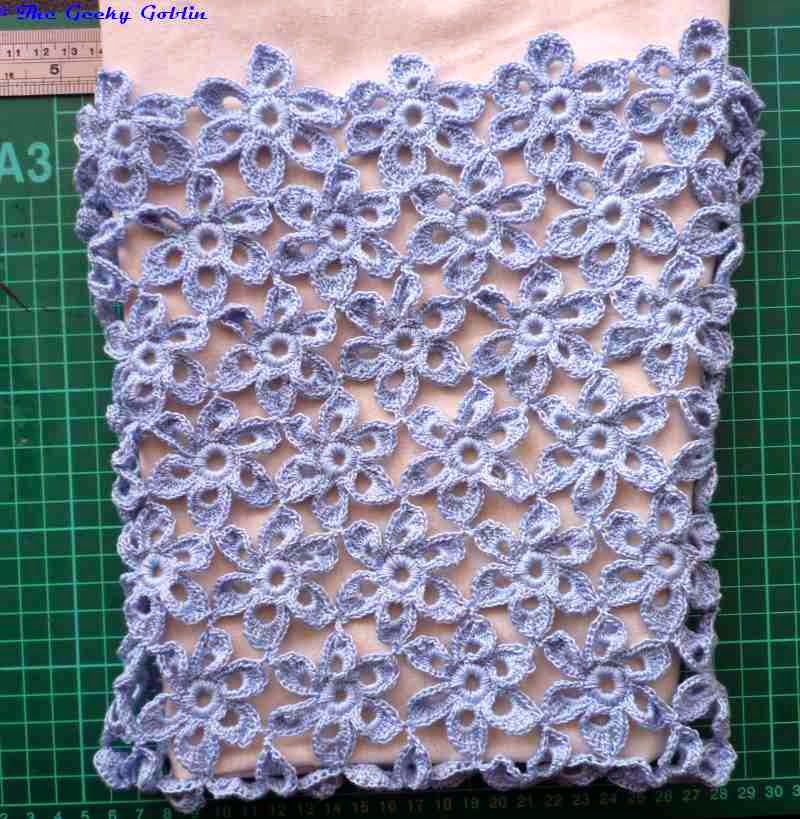
I've finished the crochet bag!  Horray!  The final bit joining the flowers to form a base was fiddly, but it turns out if you go back and read the instructions rather than making things up works well *sigh*  And of course, by finished, I mean 'up to the point where I have to sew a lining, attach to the crochet, work out a suitable handle and source all materials needed to do these things.

But I hated the baby blue thread.  Sadly, there wasn't a lot of choice when buying the thread since it was that, pink (double blech), cream or white.  So I've pulled out the dye stocks and had a go.

Here's before, in the original, baby blue thread.
And here is after I tried dying it in a mix of turquoise (blue), periwinkle (purple) and a hint of black.  The end result is a darkish, forget-me-not blue.

I have not decided what I'm going to line it with.  At the moment  I quite like the cream- a bit of spare calico- that I've used to show the pattern a bit clearer, but I'll have a think about it.

Finally, here's some jewellery that I've made.  The earrings because I found the kit when sorting out my beading stuff, and the bracelet that was something I had put into my beading stuff to be fixed and never got around to.

And this post is the last of my holiday posts.  It's closing to the end of the third week of school and sadly the large pile of marking, planning etc has sucked up all my time (free or otherwise!).  So expect irregular posts for a few months.

Sunday 3 August 2014

Discworld stamp Yearbooks

One of the last things I did on my break before pulling out the work I needed to do was to finish my most recent Discworld Stamp Yearbook.  It seemed particularly appropriate as this year is the 10 year anniversary of Discworld stamps.

These were inspired by stamp Yearbooks I have seen for Australian stamps.  Now since I don't collect them, I've only seen them for sale in the Post Office, but from what I saw, I loved the idea of information about what was featured in the stamp in addition to the stamp details and, of course, a place to put the stamps themselves!
For some stamps, I had fun researching the techniques that were used

Two of these were made several years ago, but I just finished the 2007 Discworld Stamp Yearbook and put my stamps in.  So now I want to show off my collection.


I love pages that have all the sports!


For others, I have wishful thinking gaps.
I only have one years worth of stamps to have my collection stored in as after 2008 I dropped collecting due to lack of time.  While I have bought the odd edition if it was particularly cool looking (one of these days I'm going to decoupage some of them for instance), I didn't have time to keep up as I always wanted to get the sports in addition to the commons.  Now I think about it though, I could start again with a reduced 'just the commons' policy....  *twitches*

If you would like to make a Discworld Stamp Yearbook of your own, feel free!  I've linked to the files below.  Read through my series on Bookbinding (starts here) to see how to print these out and bind them into a hard cover book.

Links (Word files)


More info on stamps

The Cunning Artificer shop (where to buy them from)
The Discworld Stamp Catalogue (if you want to identify an unknown Discworld stamp)

Sunday 27 July 2014

Magazine Folio holder

This post is a re-write of an article I wrote many years ago for the Discworld stamp journal, The Stanley Howler Stamp Journal.  The purpose of the article and this post is to create a non-damaging folio cover for magazines so they can be neat and sorted, while still just as easy to read, plus can be removed without difficulty if needed.
 

All of the sizes and measurements given here are for A5 magazines (booklets made when an A4 piece of paper is folded in half and stapled in the middle).  If you are dealing with magazines of a different size, you will need to work out your own sizes.  A good rule of thumb is to ensure that the cover is a few millimetres larger than the cover of your magazines to allow for movement and to protect the contents.

Materials

  • Thick card (posterboard or similar) NOT corrugated card for the spine in particular as it will not have the necessary compressive strength.  Two larger pieces for the cover (15.1cm by 21.8 cm) and one narrow piece (21.8 cm by the width of your spine- for an 8 journal cover 2.5 cm is good, for a 10 journal cover, I am using a 3 cm width piece)

  • A sharp knife (plus bandaids/ first aid kit/ blood bank depending on how clumsy you are!
  • A steel ruler
  • Cutting mat
  • Thick card or chipboard (for best effect the card should be difficult to fold- about the thickness of a hard cover book’s cover.).
  • PVA glue
  • Pretty paper (It is possible to get creative here if you like- fabric can be used if first stuck onto a plain piece of paper and there is practically an unlimited number of different colours and designs of paper available)
  • String or thin cord (this must be STRONG- if you can easily break it with your hands it is too weak)
  • Lots of clean, scrap paper and newspaper
  • Large flat weights (I use old textbooks)

Method

Take your two large pieces of card and the paper you will use for the cover (green in my case).  Apply an thin, even coat of glue to one side of your card and glue to the paper.

To prevent wrinkles, immediately place this, paper side down, onto a pile of your newspaper with a clean piece of scrap paper in between (so newsprint doesn't get onto your cover).  Then place a heavy book ontop. This draws the moisture of the glue out of the cover paper and the weight stops wrinkles having a chance to form.

Wait until dry, then turn over and glue the sides over.  One neat way to do this is to trim the corners on a 45 degree angle to the card corner, at least one centimetre away from the card.  Fold this over to the card and glue down.  Repeat on all corners.

Then fold and glue each side down.  Leave to dry.

In the meantime, you can also do the same thing with the spine piece, or if you choose to add mock headband affects (see step 7), then you could skip this or just colour/paint the ends.
I just coloured the ends in on my spine as I will be covering it later
Take the spine and use the back of a knife or the steel ruler to place even 'notches' in the ends of the card where the string will go.  This ensures the string stays in place.

Tape one end of the string to the back of the spine and wrap the string TIGHTLY around the spine to create the necessary number of loops for your journal.  

Tape the other end in place, then use craft glue or hot glue along the entire back to secure the string.  
Back of spine after wrapping thread, before adding glue
Front of spine.  Each length of thread will hold one magazine
Optional:  Inbetween the string on the ends, take some contrasting coloured embroidery floss or similar and glue lengths in between.  This gives the appearance of headbands of a book (see Part 3 of my Book binding series to find out what these are in more detail)
Over this, glue a piece of paper, cut to a little narrower and shorter than the spine.  This helps to secure the string and also provides a good surface to glue the book together with later.  Leave to dry.
Take another piece of paper to make the exterior spine.  This paper should be fairly thick and sturdy as it will be under the most long term stress.  The paper should be taller by at least 5 cm and the width of your spine plus 1.5 cm to allow the paper to fold, plus 2-3 cm on each side for the spine paper to be glued to the covered.  In practical terms for me, that meant a piece of paper 28 cm tall by 15 cm wide.

Carefully place the spine card onto the spine and ensure it is centred.  Mark this position, then glue the back of the spine card (the bit with the paper covering the strings) to this spine paper. Let dry.
Now you can glue the covers to the spine paper.  You want to leave room for the paper to fold or your holder will not be able to close.  Try to have a even gap of 0.75-1cm on each side.  One easy way is to use a bit of scrap card cut to size that you can use to align the cover in the correct place.
Here you can see the brown bit of scrap card I used to position the cover in the right place and straight.  You can also see that I have glued green thread between the gold string on the spine prior to gluing it to the spine paper to get a headband effect and to hide the card
Glue both covers into place and let dry.

Optional- if you are using thinner paper or you think it will get a lot of wear, you may wish to add a bit of extra reinforcing paper on the top and bottom parts.  If so, do so now.

Use a pair of scissors or a sharp knife with ruler to cut the spine paper at a slight angle.  You want this cut to be to the corner of each spine card so the paper can be folded over and glued (see the picture below).
Make the cuts at a slight angle.  Note the extra paper I've glued in first to reinforce the ends of the spines

Once the sides are glued in place, use a ruler and a knife to cut the little left over piece off, top and bottom.
Use a ruler and a sharp knife to cut off this extra piece of paper flush with the edge of the book holder

Final step is to cut some endpapers inside to neaten things up.  Either measure up some paper a few millimetres smaller than the journal holder or use one or two pieces of A4 paper.  If you can find a piece of paper long enough great, but otherwise cut both pieces to a length so that one is long enough for one cover to the edge of the other and the other the size of the other cover.  It's your choice if you would like the edge of the paper showing on the back or the front or back, but I do suggest you glue the longer piece of paper (the bit that will cover the spine) down first, then the smaller piece of paper.  Let everything dry.
Before use, lay it flat on a table, outside facing up and run your thumb down the fold lines for the covers.  This helps neatens everything up and ensures the folds look right.

To use, open each magazine in the middle and insert it under a string.  That's it!  If you have any extra bits and bobs, a page protector with with the folder holes trimmed off works well either on an extra string or inserted in or around another magazine.


Sunday 20 July 2014

80's throwback- Soft toy in a car window

When I was a kid I loved Garfield.  I liked lasagne, and so does Garfield.  I wasn't any more thrilled with Mondays then than I am now and while I didn't have a coffee habit when I was a kid, I love my coffee now.  For a while in the 80's having a Garfield in the back window was a popular thing- similar to those nodding dog figures that were a thing for a while or fluffy dice handing of the rear vision mirror.  I always wanted a Garfield in the car as a kid so when I got my first car (1979 Toyota Corona) my sister gave me one for my birthday.

Aside from fulfilling that childhood wish, Garfield has also been brilliant to identify my car in a carpark.  Particularly since Garfield is much rarer to see these days!

This was particularly useful as for my first and second cars, my key could open the door of any similar make and aged car (and vice versa!).  This caught me once on the way home from university when I hopped into my car and noticed that my stuff inside wasn't right.  Moments later the lightbulb dinged and I quickly slunk out of the stranger's car that was the same make, model and colour as mine, and walked up the road several meters to get into MY car to get home!

But my Garfield is getting old.  Years in the sun have bleached his orange fur, while the rubber in the suction cups and the thread holding them on both failed.  So Garfield needs a makeover.  Since the method is ridiculously simple and could be used for any soft toy if you were looking for a car identifier, I thought I'd share it.

Equipment

  • A small soft toy (too big and the suction cups may not hold the toy up- not to mention issues blocking a view when driving!)
  • Suction cups- I found a set of 9 with hooks built in, in a local $2 shop in the hardware related section although I sometimes see them with bathroom related stuff
  • Sharpies of assorted colours (optional if your toy is faded)
  • Sewing needle
  • Strong cotton thread
  • Glue or nail polish for knots (optional)
My Garfield fresh from the car after his previous suction cups died.


The first step is only if you have a faded toy you wish to revive for nostalgic reasons.  I wouldn't do this if it is a treasured childhood toy that is still snuggled, but if the toy is going to sit on a shelf or similarly it should be OK.  Basically, it is to give your toy a dye job using Sharpies (or non-brand name permament markers).  Sharpies these days come in all sorts of colours these days so it shouldn't be too hard to come up with the colours you need.  In my case, an orange, yellow and black.  Just run the side over the toy for the large areas or the point if colouring smaller areas.
As you can see, he looks a little blotchy but that's mainly because the camera lighting, plus that will fade a bit over time and even out.

Then sew the suction cups to each limb.  Ensure you use a good amount of thread there as UV light is going to weaken those joins over time.  If you are paranoid about your knots, add a drop of glue or nail polish to each knot.  And that's it!

Not the most exciting tutorial in the world but if you've ever wandered constantly in a carpark looking for a car in a sea of very similar coloured cars it might be worth a go!